
To set up a Flask app on cPanel shared hosting using venv and Phusion Passenger, you’ll need to follow these steps. Since you mentioned there’s no direct option for Python in the Application Manager and you only have Python 2.7 available, you’ll need to handle this manually. Here’s a step-by-step guide:
Setting up a Flask app on cPanel shared hosting using venv and Phusion Passenger requires a few manual steps. This guide will walk you through the process. Let’s assume your domain name is flaskapp.rohitchouhan.com.

For this example, we’re using a subdomain. If you’re using a subdomain, ensure it’s created before proceeding with the steps below.
Step 1: Create a Virtual Environment
1. Access Terminal
Navigate to the Terminal in your cPanel home page.

2. Navigate to Your Domain Directory in Terminal
Use the full local URL to navigate to your domain directory. Example:
cd /home1/codebp4r/flaskapp.rohitchouhan.com3. Install Virtual Environment
Run the following commands:
pip install virtualenv
virtualenv venv
If you encounter any errors, rerun the command.

You will see a folder named venv created in your flaskapp.rohitchouhan.com directory.

Activate the virtual environment by running:
source venv/bin/activate
Finally, install Flask:
pip install flask
Step 2: Set Up Your Flask Application
1. Create Your Flask Application
In your project directory, create a file named app.py with your Flask application code. You can also copy the code from this link: https://gist.github.com/rohit-chouhan/d7297ad0565479293a92d173dbb41e4f

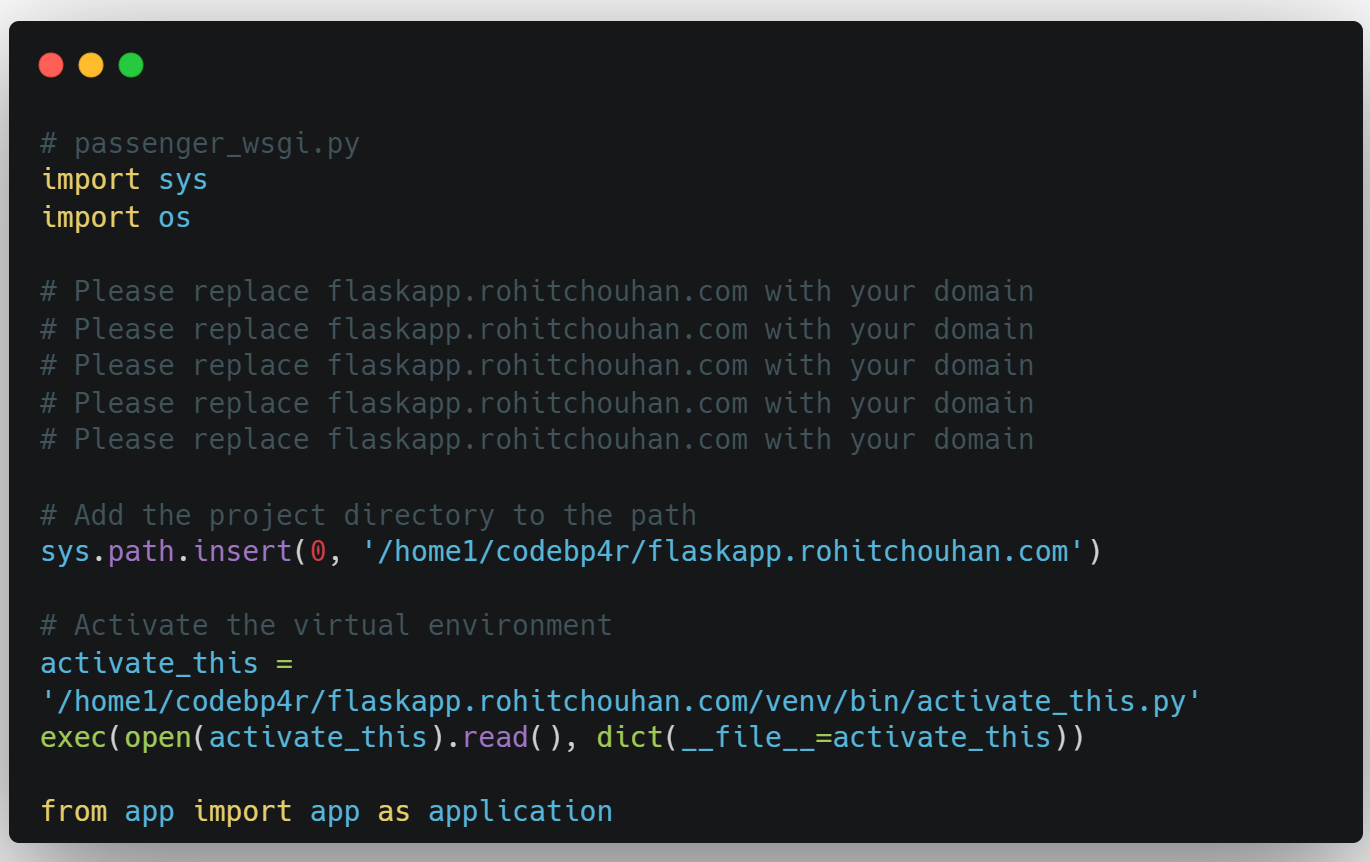
2. Create a passenger_wsgi.py File
In the same directory, create a file named passenger_wsgi.py. Copy the code from this link : https://gist.github.com/rohit-chouhan/8e5fb3ab6839bfe66b6595403845742e
Your folder should look like the image below:

Step 3: Configure Phusion Passenger
1. Go to the Application Manager
Navigate to the Application Manager in cPanel.

2. Register Your Application
Click on Register Application.

3. Set Up the Application

4. Save and Deploy
Save the settings and deploy the application.
Step 4: Test Your Application
1. Access Your Application
Visit your application in your web browser, It may take up to 1-2 hours to reflect changes.
2. Verify the Output
You should see “Hello, World!” displayed on the page.